BMW K1600 Forum banner

Lower the rear of the K1600

42K views 84 replies 43 participants last post by  Lutch  
#1 ·
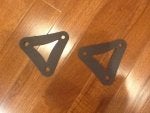
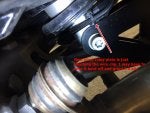
After selling out of lowering links for lowering the rear of the k1600,seat height , I had a chance to make several sets . There are 1/2 inch drop and 1 inch drop sets . I have the programs to cut 1 .5 inch links if needed . The links are easy to install and at $ 40 per set plus shipping $7 much less than new shorter shocks . I could not flat foot on my GT so I lowered it 1/2 inch now I can flat foot with my knees bent a little .It sit as if some one is sitting on the rear . No change in handling that I can note .The rear roundel holders are usually ready to ship any time . Both parts in one box will save on shipping .
 

Attachments

#7 ·
I did mine this last weekend. All I did was remove left side muffler, bike on centerstand, and loosen all bolts. You need a T45 and a T55 torx sockets.support rear wheel with a length of 1x4 under it and remove bolts and plates. Using GARS diagram for installation orientation, replace plates. I left the swing link for the last as the other two can be installed without moving the tire. To install the link bolt, you will need to move the wheel upward a little to get the bolt through. This is where the 1x4 can be used a a lever. I personally just moved the wheel by hand, but depending on your strength, you may need the board for leverage. while moving the wheel upward line up the link to allow the bolt to slip through. Tighten to proper torque specs and reinstall muffler. It took me all of 30 minutes start to finish. YMMV
Rick
 
#12 ·
Rick
What year is your bike? Does it have ESA? Mine is a 2015 with ESA. Reason I ask is that one of the bolts was different than yours. The front one was T50 and not T45. Plus I did not have to remove the muffler to get the bolts out/in.
You also will need a 16 and 18 mm socket for the nuts
According to the Service CDROM, all 3 bolts require threadlocking compound. It also says to replace the nuts (prevailing torque type), but I just added blue loctite and reused the nuts. The torque on the front bolt is 42 Nm (31 ft lbs) and the 2 rear bolts are 50 Nm (37 ft lbs)
Good tip about putting a lever under the rear wheel. Worked great!!
Also noticed that the new plates (steel) are thinner than the originals (aluminum) so the nuts thread on further.
Jim
 

Attachments

#13 ·
As I was taking the plates back off, I also noticed that the new plates were hitting a bracket on the rear shock on both sides.
When I compared the original plates to the new ones, the originals had lots of clearance. (see photo comparing the two plates.)
I'll have to grind both plates the ensure there is clearance. Mumble, mumble!!
I'm still wondering if the non-ESA shock is different than the ESA one????
Jim
 

Attachments

#15 ·
RealWing ,I have not seen the clearance problem before . With the introduction of the B and the 2018 models with the larger shock bolt I redesigned the plates to include extra material for the larger bolt .I have been using the same program for both bolt sizes .i can change the shape for clearance if needed .If you need another set with a correction send me a drawing and I will cut you a new set . Any one else having a problem please let me know so I can make new programs for the different models .
 
#16 ·
David
No need to make me a new set. I can easily grind the plates to make sure they don't hit the shock ESA bracket. For future plates, you just need to re-profile the top front of the plates to more closely match the originals (see sketch))
Thx again for the offer of new plates.
Jim
 

Attachments

#18 ·
I’m pretty sure that wire/clip is for the ESA shock. Does your shock have the black bracket on the rear of the shock like mine?
 
#21 ·
When I installed mine a took a 2X4 about 18" long and cut an angle in about half of it (making it wedge shaped). I slipped that under the tire and while laying on the floor I could tap it with a hammer one way or the other to raise or lower the tire/suspension while removing and installing the bolts. Easy Peasy.
 
  • Like
Reactions: NLDoc
#24 ·
Out of habit, working in shops for as long as I did, you center stand everything if for no other reason but parking space. I have seen my share of repair jobs on bikes that the rider '"knew" it was a good parking spot, only to find out later it was not. It is just my habit, not one I necessarily promote. I think if your good with your parking method, than it's all good.
Rick
 
#27 ·
To order please send me a personal message ,PM, for payment most customers use pay pal . The shipping is by the USPS, post office . The links come 1/2 inch drop 1 inch drop or 1.5 inch drop . Cost is $40 plus $8 in the USA . Shipping can change as the post office changes .i also make a bigger side stand foot ,with toes for fun , to weld on a shortened side stand .
 
#28 ·
David,

My 1" lowering links went on perfectly on my "B". I did mention that my bike is much more upright when the side stand is down and being used. Tell me how the new plate works so I know if I need one. I'm guessing I need to take the side stand off, cut it and have a welder weld the new plate on.

How will the foot peg work with a new foot and shorter side stand. Does it have to be moved up and welded in a new location?

By the way, thanks for the great service and yes 1" made a big difference in going from the balls of my feet to flat footed when stopped.

Bill
 
#30 ·
Hi Guys

I was reading through this after trying a B compared to my GTL and found the B far easier to manoeuvre at low speeds. I don't have an issue with seat height on the GTL, but I did like the better "car park" friendly handling on the B. Can anyone tell me - can you notice any difference in low speed handling on a GTL after fitting one of these kits, and does it impact ground clearance much?

Thanks

James
 
#31 ·
I installed the 1” lowering links on my 2014 GTL some time ago. Riding SOLO, I don’t have any clearance issues. However, when fully loaded and with the wife with me and with the suspension set to “2 up”, the center stand will sometimes touch down. To combat this, I usually keep the suspension damping at “normal” or even “sport” especially if we’re in town or traveling over uneven roads.


Sent from my iPhone using Tapatalk